Saturday, 3 January 2015

How to Turn your Windows PC into Wifi Hotspot

Windows 8 and 8.1 has a default feature to share a WiFi connection without using any third party apps. a few little tweaks in command prompt will make your Windows machine work as a WiFi Hotspot Easily.All you need is a working internet connection on your Windows machine. Either wired, USB or wireless connection can be used. Make sure you’ve a WiFi adapter on your device, especially desktop users.


Since most of the desktops only use ethernet connectivity, they won’t have WiFi adapter. So, if you don’t have WiFi connectivity on your machine, you cannot share WiFi with other devices. Lets have a look at the steps to convert your Windows machine into a WiFi hotspot.

Turn your Windows PC into Wifi Hotspot

So in this tutorial I will show 2 easy ways to share internet connection not just to create a wireless ad hoc connection in Windows 8.  One is By Using Third Party Tool and another one is without using any tool.

2 Methods to Turn Windows PC into Wifi Hotspot

Method 1. Using Connectify:

This is an Easy method so i will recommend you to first try this method. Simply follow the below simple steps.
Step 1: Download Connectify Hotspot for Free First of all.
Step 2: Install it and Restart your PC.
Step 3: If a Windows Security Alert of Windows Firewall appears, then you need to click Allow access button to add Connectify Hotspot to the list of allowed apps.

Step 4: On Next screens, you should click to choose Connectify Hotspot Lite to use it for free.
Step 5:  Hotspot Name: enter your desired hotspot name (SSID) after the "Connectify-" prefix. Only Hotspot PRO lets you choose any SSID you want. Input your desired network security key. Choose your available internet connection (Wi-Fi, LAN) that you want to share.

Then Choose Wi-Fi to create a Wi-Fi hotspot. Choose Ethernet to share over a wired connection (only available in Pro version)
Step 6: Almost Done now all you have to do is Click on Start Hotspot Button.

Method 2: Without Any Tool

Step 1: First you need to open “Command Prompt”. There will be two modes, one is normal mode and another one is Administrator mode. For this process, you need to open the Command Prompt in “Administrator Mode”.
Step 2: After you open the Window, type the following command in your Command Prompt. 
netsh wlan set hostednetwork mode=allow ssid=Hotspot key=Password123

The “ssid” represents your “WiFi Hot Spot’s name” and the “Key” represents your “WiFi Password”. You can change them, incase you need.
Step 3: Next, enter the following command and press enter to start your virtual WiFi hotspot. It should show a message that “The hosted network started”.
netsh wlan start hostednetwork
Step 4: Now, go to Control Panel -> Network and Sharing Center -> Network Connections. There you will see the newly listed “Virtual Local Area Connection”.
Step 5: Get back to the “Network and Sharing Center” and click the “Ethernet” or whatever shows in the “Connections” section. A new window will pop-up, in that select “Properties” and go to “Sharing” tab on the top.
Step 6: Enable “Allow other users to connect through this computer’s Internet Connection” option on the top. In the drop down list below, select the newly listed “Virtual Local Area Connection”. Click “Ok” and you are good to go.
Now your Windows machine will act as a virtual router, to connect all your devices. This option will be very helpful when you have an ethernet connection or a USB Connection, you can easily share WiFi and connect your other devices using this method. Try this on your Windows 8 machine and share your experience with us.
Keep visiting 

Best Command Prompt (CMD) Tricks That you must know.

5 Best Command prompt Tricks
Starting CMD:

Before moving futher with the Tricks, let me show you how to Open Command prompt in various Windows versions.
Press Win + R keys to open up RUN, type in CMD and press enter to open Command Prompt.

OR

Simply Search for CMD or Command prompt and click on it to open Command Prompt in your Windows PC

1. Change Colours in CMD:


By default CMD have Black Background, but you can change its Background Color and font color too. Follow the Below steps to Play with Colors in Command prompt.

Step 1: Open Command prompt
Step 2. Type in Color 3 to change the Font color to Green. Different Colors have thier own different Codes. here are some Codes that you can try and use.


0 = Black

1 = Blue

2 = Green

3 = Aqua

4 = Red

5 = Purple

6 = Yellow

7 = White

8 = Gray

9 = Light Blue

A = Light Green

B = Light Aqua

C = Light Red

D = Light Purple

E = Light Yellow

F = Bright White
Step 3: To change the Background Color of your CMD, simply Right Click on Top of your CMD and choose Properties.
Step 4: Now Click on Colors tab to choose your favourite color as Background color.

2. Check your I.P address and more about your internet.


With the help of Command Prompt you can easily find your IP address and DNS servers, command prompt will also return a ton of information like your host name, primary DNS suffix, node type, whether IP Routing, Wins Proxy, and DHCP are enabled, your network adapter`s description, your physical(MAC) address.
Step 1: Open CMD
Step 2 : Type in ipconfig /all

This will show you all the details about your internet Connection just like that.


3.Get Help from Command prompt.


If you are Confused and Do not know what command does what task. Then you can simply ask Command prompt to help you understand what task with the Command Perform on execution.
Simply Type in this format YourCommand/?  to get all details what that command will do. For eg: Type color 3/? to know what Color 3 command do. it will show you that color 3 command will change the font colour of your CMD. Likewise you can check for any given command.

4.Use && to run more than one command in a single line


When you want to execute more than one command in a single line use the && operator.

For Eg: hostname && whoami

The above command will display both your computer name as well the logged in user name.

5.Hide/Unhide Files and Folders


Another awesome CMD trick by which you can Hide any files or folder using CMD and you can unhide it easily too.
Yes there is a Command for it which we will execute in order to perform this trick so lets see how this is done.
Step 1: Open CMD
Step 2: Type this Command  without Quotes> "attrib +s +h Your_File_location" . Your_File_Location means the place where your files is located in your Hard disk. For Eg: I want thide a folder with name "Videos" which exists in my "D" drive, then i will Type "attrib +s +h D:\Videos" 

Step 3: The Above Command will hide my Videos folder from D drive. To Unhide it just Type this command "attrib -s -h D:\Videos"

Only Difference between both the Command is "+" & "-" Signs. 
So these were 5 Best Command Prompt Tricks for you. Do it yourself and let me know in Comment box if you like them.

Keep Visting 

5 Best Notepad Tricks that will Amaze you


5 Notepad Tricks that you can Perform now


1) Matrix Effect:

We Have Seen alot of times in movies some kind of numbers in Green Color Flashing really fast. Ever Wondered How they do it ? 


Well, Today you will learn it. Basically its a Small Batch file that helps to do it. Just follow the Below simple steps to do it yourself.


Step 1: Open Notepad.
Step 2:  Now Copy the Below Code.


Step 3: Paste the Code in Notepad and Save it by Clicking on File and then Save.
Step 4: You will be now asked the file name and Save as Type, So name the file as Matrix.bat and Choose All files in save as type.
Step 5: Remember the Destination where you save the file. Now Navigate to the Location where you saved this file. Double Click on it to See the Magic.
_________________________________________________________________________

2. Ghost Keyboard Typing:

This is a Technique by Which you can make Notepad type Automatically whatever you want. That means i will share a script which you will use to Display anything you want to and Notepad will automatically type it for you.
Step 1: Open Notepad
Step 2: Copy the Below code.


Step 3: Paste the Code in Notepad and Save it.
Step 4: Name it Trickslove.vbs and Choose All files in Save as type.
Step 5: Double Click on the saved file to See this Live Notepad Trick

______________________________________________________________________

3. Make your Computer Speak:

In the Above trick we made notepad Type automatically but now we will our own text to Speech tool with the help of small script in Notepad. You will make your Computer Speak whatever you type. Excited ? Then follow the Below Simple Steps.
Step 1: Open Notepad
Step 2: Copy and Paste the Below Code in Notepad.


Step 3: After Pasting the Above Code in Notepad, its time to Save the File. Save the File with name Speak.vbs and again choose All files in save as type

Step 4: Double Click on the File to See a pop up Window that looks something like this Picture

Now All you have to do is Type in Anything that you want it to Convert in Speech.

Then Click on Ok. Wait a second or Two and hear it do its work.

______________________________________________________________________

4. Keyboard LED lights Dancing Trick

This is another Fun Trick which will Make your Keyboard Lights ie: Numlock,Capslock and Scroll lock lights go dancing..

Step 1: Open notepad.

Step 2: Copy the Below Code and paste in it.


Step 3: Save the File with the name Led.vbs and again choose all files.

Step 4: Double click the File to open, Look down at your keyboard to See the live performance.

How to Stop:

To Stop it just follow the Below Simple Steps.
  • Open Task manager by Pressing CTRL+ALT+DELETE
  • Now Goto Process Tab
  • Scroll down and search for wscript.exe and End the Process.
______________________________________________________________________

5. 9/11 Attack.


Do you know that World Trade Center Attact can be Seen in Notepad? If you are not aware of this trick then here is how to do it.
Step 1: First of all you will Open new notepad file.
Step 2: Type in Q33N
Step 3: Click on Format > Font> and Select font as "Wingdings" now Increase the font size to 72
You will be Amazed to See What notepad Displays you.

So with this It Concludes the list of 5 Best Notepad Tricks. If you enjoyed it then please care to Share it on Social media using the Below Buttons.
Keep visiting 

Friday, 2 January 2015

How to Enable Copy Paste in CMD

Step 1: Open CMD, Just type CMD in search or Press Win + X key to select Command Prompt.


Step 2: Right Click on the Title of the CMD window and Select Properties just like its shown in the below Picture
Enable Copy paste in CMD
Step 3: You will see a Pop up Window coming up, Now on the Right hand side, Under Edit Options, Just Check Quick Edit Mode and click OK
Step 4: Everything is Done, Now just Copy any Text from Here or Anywhere else Using CTRL + C keys and just Right click using your mouse on CMD. You will see that the text is been pasted automatically in CMD. Please Understand that Using CTRL + C to Copy text is Important.

 
Likewise if you wish to Copy Text from CMD to paste elsewhere then Just Select the Text in CMD and Again just Right Click with the mouse. Your Text is Copied and ready to Paste it in any Document you want.
This Doesn’t Limit you to just Text you can even copy File or Folder path and paste it in CMD. 
Everything that you have to type manually can be copied from somewhere and pasted directly to CMD with this small Tweak
So this was just a small Tip I wanted to Share with my Readers so that you don’t have to Type any long Command in CMD which if typed incorrectly can cause errors. I hope this will help some Of you.
Keep visiting 

How to Hack Into A Windows XP User Account?


In This Post, I’ll show you how you can easily hack into a Windows XP Computer in few seconds. It may be the easiest method available on the internet. I found it two years back while playing with my PC.
Let’s Begin,

METHOD 1

1. Turn on the computer as usual.
2. As soon as the user’s screen appears, hit Ctrl+Alt+Del Twice


Press Ctrl+Alt+Del

3. In user, type ‘administrator’ and leave the password blank.

In user name, type 'Administrator' and leave password blank.


4. Click On OK, if the welcome message appears, then you have successfully hacked into the computer, if not then this method may not work.

If Welcome Screen Appears Then You Are Successful.


5.After The Desktop Appears, Click On Start>Control Panel.


6.In Control Panel, find and open User Accounts.


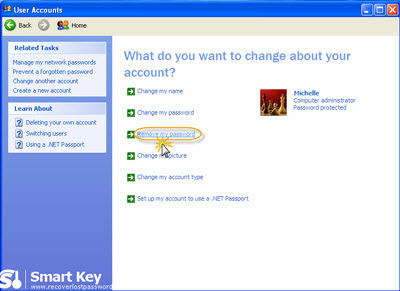
7.Select The Account With Password And Click On Remove Password.


8. After you have removed the password, just restart your computer.

METHOD 2

Note:- If you have a administrator account on the pc, then you can skip to step 6 and open cmd from start>run>enter cmd in run field and enter and then type in the net user username password command
1. Insert your Windows Vista/7/8 Setup Disc into CD/DVD Rom and boot from it.


2. Click on ‘Repair your computer’.


3. It will search for windows installation on your computer, wait for a while. After that it will show a list of OS, do not select any, just click in the white space and then click on next.

windows7repair5 copy


4. It will show a list of tools,select ‘Command Prompt.


5. After the command prompt window opens, type the following commands followed by enter key :-

Click On Command Prompt.
  • copy c:\windows\system32\sethc.exe c:\
  • copy c:\windows\system32\cmd.exe c:\windows\system32\sethc.exe
If it asks for overwriting the existing file, type ‘Y’ and press enter key.
6.Remove the setup CD and restart your computer, as the user login screen arrives press the ‘Shift’ Key 5-8 times continuosly. After the cmd window opens up type in the following command.
  • net user username newpassword
Here ‘username’ is your user account name and ‘newpassword’ is the password you wish to set.


Untitlhed-1 copy

7. Login using your new password

Feel Free To Comment!

Keep visiting 

SEE Unprotected CCTV Live Cameras on Google


1. Go to Google.com.

2. Search for "inurl:view/view.shtml" (without quote).

3. Now open any of the link from the search result and enjoy.

4. Below is the list of google dork you can use to see more cams.


inurl:/view.shtml

intitle:”Live View / - AXIS” | inurl:view/view.shtml^

inurl:ViewerFrame?Mode=

inurl:ViewerFrame?Mode=Refresh

inurl:axis-cgi/jpg

inurl:axis-cgi/mjpg (motion-JPEG)

inurl:view/indexFrame.shtml

inurl:view/index.shtml

inurl:view/view.shtml

intitle:start inurl:cgistart

intitle:”live view” intitle:axis

liveapplet

intitle:snc-z20 inurl:home/

intitle:liveapplet

intitle:”i-Catcher Console - Web Monitor”

intitle:axis intitle:”video server”

intitle:liveapplet inurl:LvAppl

intitle:”EvoCam” inurl:”webcam.html”

intitle:”Live NetSnap Cam-Server feed”

intitle:”Live View / - AXIS”

intitle:”Live View / - AXIS 206W”

intitle:”Live View / - AXIS 210″

inurl:indexFrame.shtml Axis

intitle:”Live View / - AXIS 206M”

inurl:”MultiCameraFrame?Mode=Motion”

allintitle:”Network Camera NetworkCamera”

intitle:”WJ-NT104 Main Page”


intext:”MOBOTIX M1″ intext:”Open Menu”

intext:”MOBOTIX M10″ intext:”Open Menu”

intext:”MOBOTIX D10″ intext:”Open Menu”

intitle:”netcam live image”

intitle:snc-cs3 inurl:home/

intitle:snc-rz30 inurl:home/

intitle:”sony network camera snc-p1″

intitle:”sony network camera snc-m1″

site:.viewnetcam.com -www.viewnetcam.com

intitle:”Toshiba Network Camera” user login

Keep visiting 

How to Use Keyboard as Mouse in Windows

  • You can Enable it by Pressing  Alt + Shift + Numlock keys. As soon as you do it, you will be prompt with the below dialog box, Just Click Yes to it.

Use keyboard as mouse
  • Make Sure your Numlock is Off while you Use keyboard as mouse.
  • Done !!! Now you will see MouseKeys icon on your taskbar, which means now you are all set.

  • Now talking about the Controllers,  Use 8,2,4 and 6 Keys from Numpad to move Up, Down, Left and Right Respectively.
Alternatively You can also use Third Party Program Called NeatMouse , This software is portable, Main advantage to use it is it gives you better Control because of additional options that it makes available. it have an option to Remap Controller keys according to your Comfort.
Probably we will have to Use Keyboard as Mouse temporarily and not for long time so one may not prefer to get third party software for this task, but many may do it as it is free and can be helpful.


Keep Visiting