Wednesday 31 December 2014

Any Folder as a Photo Folder

This tricks shows you how to setup any folder to display its contents as a photo folder. In many cases, you save your images/photos in a folder different than "My Pictures" (under "My Documents"). Since this folder you choose is just like any other normal folders, its contents displayed as a listing of files. You can temporary change it by just right-click and select "View" >> "Thumbnails". But if you want to change the folder so that everytime you come back, the folder itself, as well as all its subfolders, display the contents as photo thumbnails.

Here's How

Right-click on the folder you choose and select "Properties"


Select "Customize" Tab. Then under "Use this folder type as a template", select "Pictures (best for many files)"

Check on "Also apply this template to all subfolders" to apply the setting to subfoders as well

Click OK to exit 


Keep visiting 

100 Keyboard shortcuts (Windows)


We’ll kickoff the list with some really general shortcuts that you often used.


  • CTRL+C (Copy)
  • CTRL+X (Cut)
  • CTRL+V (Paste)
  • CTRL+Z (Undo)
  • Delete (Delete)
  • Shift+Delete (Delete the selected item permanently without placing the item in the Recycle Bin)
  • CTRL while dragging an item (Copy the selected item)
  • CTRL+Shift while dragging an item (Create a shortcut to the selected item)
  • F2 key (Rename the selected item)
  • CTRL+RIGHT ARROW (Move the insertion point to the beginning of the next word)
  • CTRL+LEFT ARROW (Move the insertion point to the beginning of the previous word)
  • CTRL+DOWN ARROW (Move the insertion point to the beginning of the next paragraph)
  • CTRL+UP ARROW (Move the insertion point to the beginning of the previous paragraph)
  • CTRL+Shift with any of the arrow keys (Highlight a block of text)
  • Shift with any of the arrow keys (Select more than one item in a window or on the desktop, or select text in a document)
  • CTRL+A (Select all)
  • F3 key (Search for a file or a folder)
  • Alt+Enter (View the properties for the selected item)
  • Alt+F4 (Close the active item, or quit the active program)
  • Alt+Enter (Display the properties of the selected object)
  • Alt+Spacebar (Open the shortcut menu for the active window)
  • CTRL+F4 (Close the active document in programs that enable you to have multiple documents open simultaneously)
  • Alt+Tab (Switch between the open items)
  • Alt+ESC (Cycle through items in the order that they had been opened)
  • F6 key (Cycle through the screen elements in a window or on the desktop)
  • F4 key (Display the Address bar list in My Computer or Windows Explorer)
  • Shift+F10 (Display the shortcut menu for the selected item)
  • Alt+Spacebar (Display the System menu for the active window)
  • CTRL+ESC (Display the Start menu)
  • Alt+Underlined letter in a menu name (Display the corresponding menu)
  • Underlined letter in a command name on an open menu (Perform the corresponding command)
  • F10 key (Activate the menu bar in the active program)
  • RIGHT ARROW (Open the next menu to the right, or open a submenu)
  • LEFT ARROW (Open the next menu to the left, or close a submenu)
  • F5 key (Update the active window)
  • Backspace (View the folder one level up in My Computer or Windows Explorer)
  • ESC (Cancel the current task)
  • Shift when you insert a CD-ROM into the CD-ROM drive (Prevent the CD-ROM from automatically playing)


Dialog Box Keyboard Shortcuts

  • CTRL+Tab (Move forward through the tabs)
  • CTRL+Shift+Tab (Move backward through the tabs)
  • Tab (Move forward through the options)
  • Shift+Tab (Move backward through the options)
  • Alt+Underlined letter (Perform the corresponding command or select the corresponding option)
  • Enter (Perform the command for the active option or button)
  • Spacebar (Select or clear the check box if the active option is a check box)
  • Arrow keys (Select a button if the active option is a group of option buttons)
  • F1 key (Display Help)
  • F4 key (Display the items in the active list)
  • Backspace (Open a folder one level up if a folder is selected in the Save As or Open dialog box)

Microsoft Natural Keyboard Shortcuts

  • Win (Display or hide the Start menu)
  • Win+BREAK (Display the System Properties dialog box)
  • Win+D (Display the desktop)
  • Win+M (Minimize all of the windows)
  • Win+Shift+M (Restore the minimized windows)
  • Win+E (Open My Computer)
  • Win+F (Search for a file or a folder)
  • CTRL+Win+F (Search for computers)
  • Win+F1 (Display Windows Help)
  • Win+ L (Lock the keyboard)
  • Win+R (Open the Run dialog box)
  • Win+U (Open Utility Manager)

Accessibility Keyboard Shortcuts

  • Right Shift for eight seconds (Switch FilterKeys either on or off)
  • Left Alt+left Shift+PRINT SCREEN (Switch High Contrast either on or off)
  • Left Alt+left Shift+NUM LOCK (Switch the MouseKeys either on or off)
  • Shift five times (Switch the StickyKeys either on or off)
  • NUM LOCK for five seconds (Switch the ToggleKeys either on or off)
  • Win +U (Open Utility Manager)

Windows Explorer Keyboard Shortcuts

  • END (Display the bottom of the active window)
  • HOME (Display the top of the active window)
  • NUM LOCK+* (Display all of the subfolders that are under the selected folder)
  • NUM LOCK++ (Display the contents of the selected folder)
  • NUM LOCK+- (Collapse the selected folder)
  • LEFT ARROW (Collapse the current selection if it is expanded, or select the parent folder)
  • RIGHT ARROW (Display the current selection if it is collapsed, or select the first subfolder)

Shortcut Keys for Character Map

  • After you double-click a character on the grid of characters, you can move through the grid by using the keyboard shortcuts:
  • RIGHT ARROW (Move to the right or to the beginning of the next line)
  • LEFT ARROW (Move to the left or to the end of the previous line)
  • UP ARROW (Move up one row)
  • DOWN ARROW (Move down one row)
  • PAGE UP (Move up one screen at a time)
  • PAGE DOWN (Move down one screen at a time)
  • HOME (Move to the beginning of the line)
  • END (Move to the end of the line)
  • CTRL+HOME (Move to the first character)
  • CTRL+END (Move to the last character)
  • Spacebar (Switch between Enlarged and Nor mal mode when a character is selected)

Microsoft Management Console (MMC) Main Window Keyboard Shortcuts

  • CTRL+O (Open a saved console)
  • CTRL+N (Open a new console)
  • CTRL+S (Save the open console)
  • CTRL+M (Add or remove a console item)
  • CTRL+W (Close window/tab)
  • F5 key (Update the content of all console windows)
  • Alt+Spacebar (Display the MMC window menu)
  • Alt+F4 (Close the console)
  • Alt+A (Display the Action menu)
  • Alt+V (Display the View menu)
  • Alt+F (Display the File menu)
  • Alt+O (Display the Favorites menu)

MMC Console Window Keyboard Shortcuts

  • CTRL+P (Print the current page or active pane)
  • Alt+- (Display the window menu for the active console window)
  • Shift+F10 (Display the Action shortcut menu for the selected item)
  • F1 key (Open the Help topic, if any, for the selected item)
  • F5 key (Update the content of all console windows)
  • CTRL+F10 (Maximize the active console window)
  • CTRL+F5 (Restore the active console window)
  • Alt+Enter (Display the Properties dialog box, if any, for the selected item)
  • F2 key (Rename the selected item)
  • CTRL+F4 (Close the active console window. When a console has only one console window, this shortcut closes the console)

Remote Desktop Connection Navigation

  • CTRL+Alt+END (Open the m*cro$oft Windows NT Security dialog box)
  • Alt+PAGE UP (Switch between programs from left to right)
  • Alt+PAGE DOWN (Switch between programs from right to left)
  • Alt+INSERT (Cycle through the programs in most recently used order)
  • Alt+HOME (Display the Start menu)
  • CTRL+Alt+BREAK (Switch the client computer between a window and a full screen)
  • Alt+Delete (Display the Windows menu)
  • CTRL+Alt+- (Place a snapshot of the active window in the client on the Terminal server clipboard and provide the same functionality as pressing PRINT SCREEN on a local computer.)
  • CTRL+Alt++ (Place a snapshot of the entire client window area on the Terminal server clipboard and provide the same functionality as pressing Alt+PRINT SCREEN on a local computer.)

Internet Explorer navigation

  • CTRL+B (Open the Organize Favorites dialog box)
  • CTRL+E (Open the Search bar)
  • CTRL+F (Start the Find utility)
  • CTRL+H (Open the History bar)
  • CTRL+I (Open the Favorites bar)
  • CTRL+L (Open the Open dialog box)
  • CTRL+N (Start another instance of the browser with the same Web address)
  • CTRL+O (Open the Open dialog box, the same as CTRL+L)
  • CTRL+P (Open the Print dialog box)
  • CTRL+R (Update the current Web page)
  • CTRL+W (Close the current window)
keep visiting 

    Facebook Bans 20,000 Underage Users A Day


    Some 20,000 children under age 13 get kicked off of Facebook for lying about their age every day.

    That came out during testimony by one Facebook’s privacy advisors, Mozelle Thompson, before Australia’s parliamentary cyber-safety committee, according to the Daily Telegraph.

    Facebook’s rules require users to be at least 13 years old, but like Thompson said to Parliament, as quoted by the paper:


    There are people who lie. There are people who are under 13 [accessing Facebook]. …Facebook removes 20,000 people a day, people who are underage… It’s not perfect.

    An Australian member of Parliament suggested that Facebook ought to require teenagers to obtain parental permission to join the site. We applaud that general idea but in practice wonder how a company could possibly enforce something like that.

    Facebook plans to hire an Australian-based policy person who would deal with this issue among others, effectively mirroring what the Washington D.C. staff do for the social network in the capitol of the U.S. But policing underage users of the site would have to compete for that staffer’s attention with a host of other concerns.

    Readers, what do you think Facebook should do about the large number of underage users on the site?

    Keep visiting

    Use Notepad As A Diary?


    Ever wanted to maintain a diary on your PC ?
    Now, you can do it without the use of a software !


    USE NOTEPAD !

    Do The Following :
    1. Open Notepad
    2. Type : .LOG
    3. Save it with any name say 'Diary'
    4. Open Diary.txt again.


    Wow you see today's date and time, so start writing your Diary !

    Keep visiting :)

    HOW TO SHARE PC INTERNET ON ANDROID DEVICE USING USB DATA CABLE

    Friends, I think you all know about Tethering in your android phone. Tethering is the technique to share internet from your android phone to your PC or laptop. Tethering can be done by two methods. First one is by USB and second one is by Wi-Fi. But friends, sometimes a situation comes when you have internet access on your pc but not on your android device and you don’t have Wi-Fi hotspot also. Then what will you do if you want to access same internet on your android phone ?

     No problem friends, I have already faced this problem so I am writing this post to help you to overcome from this situation. But one and only limitation of this trick is that you should have rooted android phone and if you have rooted phone then keep reading this post. I will try to help you step by step.

    Do you know this technique of using PC internet on android phone is known as Reverse Tethering. So lets start reverse tether your android phone.


    STEP 1.

    First of all Download Android Reverse Tethering.rar [4.55 MB] On your pc. Now Extract the folder using password – way2hacking


    STEP 2.

    When you will extract the folder you’ll see some files in that folder but you have to open AndroidTool.exe as shown in below screenshot.


    STEP 3.

    Now just enable DEBUGGING MODE in your android device and connect it with your pc using your data cable.


    STEP 4.


    Now refresh the device list in the AndroidTool.exe as shown in below screenshot and you will see your device there. After getting your device in list just click on that and then click on connect. Wait for some seconds and done. Enjoy your pc internet on your android device. If you still have any problem then feel free to ask below in comment section.


     Keep Visiting


    Tuesday 30 December 2014

    How to Fix "This Copy Of Windows 7 Is Not Genuine" Problem

    Often we can notice users asking for 'Windows 7 not genuine error fix'. Anyway, few friends of mine report me that they are facing an annoying "This copy of Windows 7 is not genuine" after using the Windows 7 for few days. Now the reason is pretty obvious, yes they are using Pirated copy of Windows 7. Well, whatever but they are expecting a fix from me as soon as possible. Now this is the time for me to prove myself since I can’t let down my friends expectations. Anyhow if you’re also facing a similar issue on your windows 7, I have an easy guide which will help you to fix 'Windows 7 Not Genuine Error' Read on to know how you can fix it

    .

    Just because we are providing you a solution to "This copy of Windows is not Genuine" problem, it doesn’t mean I'm supporting piracy. I'm solely against piracy and of course, the best way to solve this problem is to buy a genuine copy of windows 7 from market or online store. This solution is only for those who are not in the position of purchasing a brand new copy of Windows 7 at the moment. Now let’s get you into the solution where I have summed up a step by step guide.

    Method-1(Using WAT Remover Software):
    1. First you need to download WAT Remover software, so download it from Here
    2. Now, Run this application. remember that this is an illegal software and your anti-virus will treat it as Potentially Harmful Software, so run this software directly from Zip file or Disable your anti-virus for 1 minute.


    3.
    Click on  "Remove WAT".


    4. Confirm by click on OK when asked 


    5. Wait for the process and confirm restart and all done, simple!! 

    To confirm that "WAT" is removed, right click on "My Computer" and select "Properties". If the process was successful there will not be any "Windows Activation Status" column as earlier. This method works for all Windows 7 versions (Basic, Premium, Ultimate).


     NOTE: DO NOT update Windows after WAT removal (by default Windows update is set as "Automatic”' change this option to "Never"), as it may reverse the process. 

    Method-2(Using CMD without Software):

    1. First,  you need to open command prompt as Administrator, so open it.

      
    2. Now once the command prompt window is opened, type the following command: SLMGR -REARM 

    Make sure that you have opened the command prompt using "Run as administrator option" or else this command will not work. See the picture below as reference.
      
     
    3. After entering the command as it is, hit the enter button on your keyboard to execute the operation.

     
    4. Right after entering the command a confirmation window will popup stating that "Command completed successfully, please restart the system for the changes to take 
    effect". 
    So follow the instructions and restart the computer so that the changes you have made can take effect.


    5. After restarting the computer, you may not receive any "This Copy of Windows Is Not Genuine" error.

     
    So, finally congratulations, you’ve fixed the Windows 7 not genuine error in windows 7.
    Now the annoying "This Copy of Windows Is Not Genuine" won’t popup again and again at your taskbar. Anyway, if you’re facing any problem at any step, feel free to ask us through comments below.........
    Keep Visiting

    How to Hack Android Mobile

    Nowadays mobile users are increasing day by day, the security threat is also increasing together with the growth of its users. Our tutorial for today is how to Hacking Android Smartphone Tutorial using Metasploit. Why we choose android phone for this tutorial? simply because lately android phone growing very fast worldwide. Here in China you can get android phone for only US$ 30 it's one of the reason why android growing fast.


    What is android? according to wikipedia:

    Android is an operating system based on the Linux kernel, and designed primarily for touchscreen mobile devices such as smartphones and tablet computers. Initially developed by Android, Inc., which Google backed financially and later bought in 2005, Android was unveiled in 2007 along with the founding of the Open Handset Alliance: a consortium of hardware, software, and telecommunication companies devoted to advancing open standards for mobile devices.

    and what is APK? according to wikipedia:

     Android application package file (APK) is the file format used to distribute and install application software and middleware onto Google's Android operating system; very similar to an MSI package in Windows or a Deb package in Debian-based operating systems like Ubuntu.


    Here is some initial information for this tutorial:

    Attacker IP address: 192.168.8.94

    Attacker port to receive connection: 443

    Requirements:

    1. Metasploit framework (we use kali Linux/1.0.6 in this tutorial)

    2. Android smartphone (we use HTC One android 4.4 KitKat)


    Step by Step Hacking Android Smartphone Tutorial using Metasploit:

    1. Open terminal (CTRL + ALT + T) view tutorial how to create linux keyboard shortcut.

    2. We will utilize Metasploit payload framework to create exploit for this tutorial.


    As described above that attacker IP address is 192.168.8.94, below is our screenshot when executed the command   


    3. Because our payload is reverse_tcp where attacker expect the victim to connect back to attacker machine, attacker needs to set up the handler to handle incoming connections to the port already specified above. Type msfconsole to go to Metasploit console.  


     Info


    4. The next step we need to configure the switch for the Metasploit payload we already specified in step 3.


    Info: 

    Info:


    5. Attacker already have the APK's file and now he will start distribute it (I don't need to describe how to distribute this file, internet is the good place for distribution.


    6. Short stories the victim (me myself) download the malicious APK's file and install it. After victim open the application, attacker Metasploit console get something like this:


    7. It's mean that attacker already inside the victim android smartphone and he can do everything with victim phone


    Conclusion:

    1. Don't install APK's from the unknown source.

    2. If you really want to install APK's from unknown source, make sure you can view, read and examine the source code. The picture below is the source code of our malicious APK's in this tutorial.


    Share this post if you found it useful :-)
    Share this post if you found it useful :-)

    Keep Visiting


    3. Because our payload is reverse_tcp where attacker expect the victim to connect back to attacker machine, attacker needs to set up the handler to handle incoming connections to the port already specified above. Type msfconsole to go to Metasploit console.


    As described above that attacker IP address is 192.168.8.94, below is our screenshot when executed the command
    As described above that attacker IP address is 192.168.8.94, below is our screenshot when executed the command


    How to Hack Wi Fi Using Android

    Do you want to test your network security? It used to be that you needed a desktop OS such as Windows or Linux installed on a computer with a specific wireless network card. Now, however, you can also use certain Android devices to scan and crack wireless networks. These tools are available for free as long as your device is compatible. Hacking routers without permission is illegal. These steps are provided to test the security of your own network.


    1. Root a compatible device. Not every Android phone or tablet will be able to crack a WPS PIN. The device must have a Broadcom bcm4329 or bcm4330 wireless chipset, and must be rooted. The Cyanogen ROM will provide the best chance of success. Some of the known supported devices include:


    •  Nexus 7
    •  Galaxy Ace/S1/S2/S3
    •  Nexus One
    •  Desire HD

    Download and install bcmon. This tool enables Monitor Mode on your Broadcom chipset, which is essential for being able to crack the PIN. The bcmon APK file is available for free from the bcmon page on the Google Code website.
    • To install an APK file, you will need to allow installation from unknown sources in your Security menu.

        3.Run bcmon. After installing the APK file, run the app. If prompted, install the firmware and tools. Tap the "Enable Monitor Mode" option. If the app crashes, open it and try again. If it fails for a third time, your device is most likely not supported.
    • Your device must be rooted in order to run bcmon.


    4. Download and install Reaver. Reaver is a program developed to crack the WPS PIN in order to retrieve the WPA2 passphrase. The Reaver APK can be downloaded from the developers' thread on the XDA-developers forums.


    5. Launch Reaver. Tap the Reaver for Android icon in your App drawer. After confirming that you are not using it for illegal purposes, Reaver will scan for available access points. Tap the access point you want to crack to continue.
    • You may need to verify Monitor Mode before proceeding. If this is the case, bcmon will open again.
    • The access point you select must accept WPS authentication. Not all routers support this.


    6. Verify your settings. In most cases you can leave the settings that appear at their default. Make sure that the "Automatic advanced settings" box is checked.


    7. Start the cracking process. Tap the "Start attack" button at the bottom of the Reaver Settings menu. The monitor will open and you will see the results of the ongoing crack displayed.


    • Cracking WPS can take anywhere from 2-10+ hours to complete, and it is not always successful.
    Keep Visiting


    8 ways to access blocked websites


    1. Using IP instead of URL

    2. Redirection with short URL service

    3. Google cache


    Search engines like Google and Yahoo cache webpages and these cached pages are stored in search engines themselves, which likely will be added to the blocked list. Click on the ‘cache’ will bring you to a cache version of the page, as updated as how Google caches it.

    4. Internet Archive – Wayback Machine

    Wayback Machine is a internet service that periodically keeps a copy of almost all websites in the Internet way from the date they’re started. Clicking on the latest copy of what Wayback Machine have should be somewhat similar to the real site.

    5. Anonymous surfing

    - Hidemyass.com
    - anonymizer.com
    - wujie.net
    - ultrareach.net


    6. Use Proxy in Browsers

    7. Bypass with translation services

    Use Google translate.
    Open Google translate ,type the URL and translate page.


    8. Retrieve web pages via Email

    Web2Mail is a free service that sends websites you want to read right into your inbox. All you need to do is send an email to www@web2mail.com with the URL as subject title.


    Keep Visiting

    Hacking Facebook: Scammers Trick Users to Gain Likes and Followers

    Late last week, Facebook users in India were tricked by scammers who were claiming to offer a tool that could hack Facebook in order to obtain passwords belonging to the users’ friends. Unfortunately for these users, they actually ended up hacking their own accounts for the scammers and exposed their friends in the process.


    Figure 1. Scam promoting how to hack your Facebook friends

    Want to hack your friends?


    A post began circulating on Facebook from a particular page featuring a video with instructions on “Facebook Hacking” with a disclaimer stating that it was for education purposes only. The post links to a document hosted on Google Drive that contains some code that, according to the scam, will allow users to reveal their friends’ Facebook passwords. The instructions attempt to convince the user to paste the code into their browser console window and asks them to wait two hours before the hack will supposedly work.

        You just hacked yourself


    Figure 2. Facebook account hijacked to follow and like various pages
    What really happens when you paste this code into your browser console window is that a series of actions are performed using your Facebook account without your knowledge. Behind the scenes, your account is used to follow lists and users, and give likes to pages in order to inflate the follower and like counts defined by the scammers.


    Figure3_5.png

    Figure 3. What does the Fox say? I have over 56,000 likes!

    Your account is also used to tag the names of all your friends in the comment section of the original post. This is done to help the scam spread further, playing off the curiosity of your friends, who may visit the post to find out more and hopefully follow the instructions as well.


    Figure4_6.png
    Figure 4. User’s compromised account tags friends in the original scam post

    What is this type of scam called?

    This scam is a variation of a method known as self-XSS (self cross-site scripting), where a user is tricked into copying and pasting code into their browser’s console that will perform various actions on their behalf.

    Facebook is trying to discourage users from unwittingly causing harm to their accounts through this method. Some users that attempt to paste code may receive a warning from within their browser’s developer console that points to the following link:
    https://www.facebook.com/selfxss

    Is this type of scam new?

    This type of scam originally began circulating back in 2011. This current iteration has been around since at least the beginning of 2014.

    The original scammers behind this iteration had great success with the scam at the beginning of this year, netting between 50,000 to 100,000 likes and followers on a number of pages and profiles. Some of the variable names in the code (mesaj and arkadaslar) suggest the authors are of Turkish descent.

    Why is this affecting users in India?


    For this campaign, the individuals responsible are based in India. They have modified the original authors’ code by simply adding their own pages and profiles into the script to increase their follower and like counts.

    What to do if you have fallen for this scam


    If your account has liked and followed a number of pages and profiles without your consent, you should review your activity log. From your activity log, you can locate, unlike and unfollow the pages and profiles associated with this scam.  You should also consider posting a status update notifying your friends about the scam to make sure they don’t fall for the same trick.


    The opposite of ethical hacking


    Figure5_3.png


    Figure 5. Scammers label their efforts as “ethical hacking”
    While investigating this scam, we found that the individuals behind it were publicly discussing their efforts. Speaking in Punjabi, one of the individuals summed it up by saying, “Now this is the way ethical hacking is happening.” However, these efforts couldn’t be further from the concept of ethical hacking.


    A lesson learned
    Always remember that if it sounds too good to be true, it is. Being able to hack someone’s Facebook password by just pasting some code into your browser sounds way too easy and should signal that this is a scam. At the end of the day, your account would be impacted and the safety of your account could be at risk. It’s best to err on the side of caution and think twice before following instructions that ask you to paste code into your browser to hack passwords or unlock features on a website.

    Keep Visiting

    How To Create Run Commands in Windows

    There is no doubt that Microsoft Windows is the most widely used operating system in all parts of the world. Apart from being simple to use, it is quite rich in features as well, which makes our lives quite easy.


    Create Run Commands


    The Run command available on Windows operating system is one such power packed feature that lets you to open a document or an application instantly with the help of just 1 command. So, rather than clicking several icons or using multiple commands, you can use the Run command to open any program or document instantly. For that you will need to Create Run Commands for any software of your Choice which you use Frequently.


    But, do you know how to Create Run Commands of your Own? Well, it is really easy, which involves just few steps. Through this article, I will help you understand how to access your favorite applications by creating custom Run commands.

    Open Run Command:

    Before I show you how to create your own Run commands, let’s take a quick look on how to open Run Command. First of all, you need to open the Run window by just pressing the Windows Key along with the R key, i.e. Windows + R. Now, you have to type the name of the program that you desire to open up or execute. Unfortunately, not all programs can be accessed through this method. So, let me show you how to create Run commands that do not come as inbuilt commands.


    Steps to Create run commands of your own


    Step 1. The first step is to select the software or application for which you want to make custom Run command. For example, let us consider Google Chrome as the example here. Remember, you can choose any application other than which is already there in the Run command.

    Step 2. In the second step, right click on the desktop of your computer system and make a new shortcut.

    Right click > New > Shortcut

    Step 3. As you select the Shortcut option in the 2nd Step, it will open up a dialog box. And, the dialog box will ask you path of the application or software for which you want to create the Run command.

    Step 4. Now, you need to browse through the files and choose the one that shows “chrome.exe”. Well, it is quite obvious that all the executable files can be found in the C drive (or wherever the Operating System has been installed), inside the folder “Program Files”. For example, “C:\Program Files\Google Chrome\chrome.exe”

    Step 5. Once you are done with Step number 4, just click on “Next” button and simply provide a relative name to that shortcut. Remember, the same name will be used later in the Run command.

    For example, “GC” for Google Chrome


    Step 6. Now, click on the “Finish” button. Once it is done, an icon related to that application or software will show up on your computer’s screen. It means that the process of creating shortcut has been done successfully.

    Step 7. In this step, just cut and paste that recently made shortcut icon into your computer’s root drive, in its Windows folder.

    For example, C:\ Windows , Make sure you are the administrator of the computer or have its password.

    Step 8. Now, you are done with the set up and can run the application through Run Command. Just go to Run and enter the keyword “GC”, and Google Chrome will begin executing.

    So this was a Short but Usefull Tutorial to Create Run Commands for any software in windows,I Hope this Post will Easeup your Work, Stay Tuned and Subscribe to this Blog to Recieve Updates Everytime a New article is posted. Subscribe Box.

    Keep Visiting

    9 Ways To Keep Hackers off Your Facebook Account

    If you are like millions out there, Facebook has become your no. 1 website on the Web. As you login to it every single day from many devices, be it from your mobile phone, computer, laptop and office workstation, there is a chance that you may leave your Facebook account on without logging out. If your account gets accessed by strangers, it’s going to open up a large can of worms, so you should seriously try to prevent unwanted access to your account.

    Security on Facebook

    There are many ways to prevent access to your account by the next person to use the device, the easiest of which is to log out. However if your smartphone or device gets stolen, it’s a whole different matter. In this article, we will go through some important options you can take to prevent others from accessing your personal Facebook account.

    1. Create Strong Password

    Chances are, you already have your password created for Facebook however it is advisable for you to make sure your Facebook password is one of a kind and different from your other online accounts e.g. email, blog, hosting etc.
    To change your password, go to Account Settings > General > Password.


    The best passwords would have the combination of small and capital letters, numbers and symbols.

    2. Confirm your mobile number

    Confirming your mobile number is one of many ways to enhance your account security on Facebook. This way, even when you lose or forget your password, Facebook will be able to send you a new one via SMS.

    To add your mobile number, go to Account Settings > Mobile and click on Add a Phone.

    Add mobile
    Select your country and set the mobile carrier before clicking Next.

    add acrrier
    Now you will be given an instruction to send an SMS to the given number. Follow the instructions to get a code via SMS, and then enter the code into the column. You also have the option to Share your number with friends on Facebook and Allow friends to text me from Facebook. Select your preferences and click Next.
    add mobile: code
    Now your mobile phone is registered with Facebook, and when the need arises, this connection will be useful to reactivate your Facebook account.

    3. Activate Secure browsing, Now


    Among other things, to make sure your browsing activity within Facebook is safe, you can turn on the Secure browsing option. By doing this, you automatically limit all external applications that are integrated with Facebook from doing any harm or taking your personal information without your knowledge or approval.
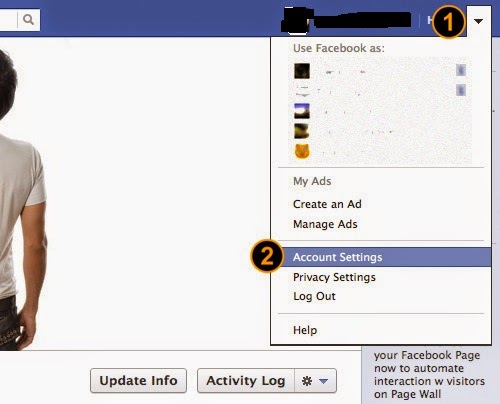
    To start securing your account, click on the drop down menu from the top right corner of your Facebook account and go to Account Settings.


    Select Security from the left menu.

    Security

    At the Secure Browsing section, click on the Edit link at the right.

    Secure browsing

    The option panel will appear, ‘check’ the box Browse Facebook on a secure connection then click on the Save Changes button.

    Security Settings

    4. Activate ‘Login Approvals’

    Login approvals is an extended security feature offered by Facebook, and it will require you to enter a security code each time you try to access your Facebook account from unrecognized devices. To activate Login Approvals, go to Account Settings > Security, look for Login Approvals and click on the Edit button.

    Login Approvals
    An option to activate Login Approvals will appear, tick the check box to activate.
    Activate login approvals

    A popup window will appear with descriptions of login approvals, click on the Set Up Now button to continue.

    Setup Now

    If you already register your mobile number, Facebook will automatically send you a code via SMS. Enter this code in the given box and click Submit Code.

    enter code

    Now you have completed with Login Approvals request, click Next to continue.

    Next

    Next, Facebook will offer you to setup a Code Generator from your mobile phone; this is useful in case you are unable to receive SMS. Click Continue.

    Code generator

    Code Generator for Android phones

    Since I am using an Android phone, I’ll use the Android activation as an example.
    Download the Facebook Mobile App from Google Play if you don’t already have it. After downloading it to your mobile, click Next.

    Code generator app

    Once downloaded, Facebook will provide instructions to install the Code Generator. To install, launch your Facebook App, tap on menu > Account > Code Generator > Add App. Then click on Finish Setup below.

    Code generator setup

    Now that your Code Generator is active, Facebook will guide you with the correct steps to use the code generator. Next time when you want to generate a new code, simply launch your app, tap on Account > Code Generator and the code will appear. For now, click Close as you have completed the steps to activate your Login Approvals.

    Code generator guide

    5. Disconnect Previous Active Sessions

    The good thing about Facebook is that it lets you know about your previous active sessions, where you login from, and what devices you used to access your Facebook account. Now to make sure your account is safe, from the Account Settings > Security page, look for ‘Active Sessions‘ and click on Edit.

    Active Sessions

    Now all previous sessions will be listed, together with the current active session at the top of the list. Click on the link ‘End Activity‘ to kill the activities from other devices.

    End Sessions

    6. Activate Private Browsing

    Another way to prevent another person from accessing your account is by activating the ‘Private Browsing’ option from your browsers. All browsers have this private browsing option, and by activating this option, your activity will not be logged into the browsing history.

    Safari

    If you are using the Safari Browser on Mac, activate Private Browsing from the menu with Safari > Private Browing.

    Safari private browsing

    Firefox

    For Firefox, go to Tools > Start Private Browsing.


    Firefox private browsing

    Chrome

    If you are using Chrome, there’s an option to browse using the Incognito window, it’s a version of Chrome window where all browsing activity will not be logged in. To open this window, go to File > New Incognito Window.

    Chrome private browsing

    7. Don’t ‘Keep Me Logged In’

    The moment you want to login to your Facebook account, at the Log In page, there’s a small checkbox that says Keep me logged in. Make sure this box is unchecked. Then, log in as usual. With this on, you will be asked for your email and password every time you launch Facebook.


    Keep me Logged In

    8. Avoid Spam Links

    Facebook is serious about spam and is always enhancing its features to make sure you are safe from being a victim to scams. The types of attacks include money scams through direct or indirect requests via Facebook messages, chat etc, phishing links that will redirect you to fake websites, malicious links that could retrieve your personal information or even harm your computer. There are also chances you may receive emails from ‘Facebook’ but it is actually from a phishing website, this modus operandi is part of a scam.

    Facebook Security
    There are many ways you can avoid being a victim:

    1. Never click on suspicious links whenever or wherever you find it, even if it came from your friends. If you receive a link, always take the extra step of asking your friend what the link is to confirm that they had sent it. Usually these links are ‘sent’ without the sender’s knowledge. This includes all links that appear in your Facebook Chat, Messages, friend’s status post or even from your email.

    2. Never give out your username or password to anyone, including websites with suspicious links and layouts. Giving your passwords freely could jeopardize the security of your personal information on Facebook.

    3. Log in only at www.facebook.com and not from any other link or website, unless you are accessing via Facebook App.

    4. Update your browser to its latest version to ensure your browser’s security is up to date so it would detect and alert you with a warning when you are navigating to a suspected phishing site.

    9. Sign Out after use

    Lastly which is the most important of all (and definitely worth repeating), never forget to log out from your Facebook account.

    Keep Visiting